
By Erin La Row, PostPress
Since the beginning of books, there has been a need for binding. When Hindi scribes in India began binding palm-leaf manuscripts together with twine during the second century BC, so began the craft of bookbinding. 1 Over time, the need has remained, although the techniques have evolved.
For some, bookbinding is where art meets function. And despite the growth of ebooks, there’s still value in printed pieces that are tactile and aesthetically pleasing. Today, there are many binding methods – some simple, others more elaborate. There are so many creative options available that Sabine Lenz and the team at PaperSpecs created the “Binding Cheat Sheet” to empower graphic designers to “unlock their creativity and create printed pieces that WOW their clients.” Selecting the right style can make all the difference in the look and feel of a printed piece.
Most designers and others in the graphic arts arena are familiar with techniques such as saddlestitching, perfect binding, and mechanical binding options such as plastic coil and Wire-O, but they may not be aware of other specialty binding methods available today. A specialty binding technique could be what elevates a project to the next level. The following is a look at some unique binding techniques.
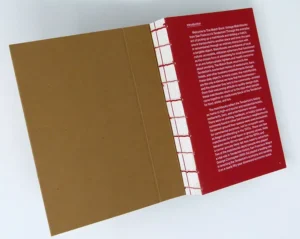
Japanese binding
Japanese binding, also called stab binding or hand-sewn binding, dates back centuries and today provides luxurious appeal. Sheets are hole-punched or drilled (typically, four to six times) and hand-sewn along the spine in various patterns. Books can vary in size from four to 480 pages. This is a technique that can be visually stunning when bright or contrasting thread colors are used. It’s important to note that this technique produces a book with a spine that does not allow the book to lay flat. There is no gluing or folding involved, providing a beautiful hand-crafted result without special machinery to create the binding. It is great for individual books or for extremely short runs of just a few, as it doesn’t require an automated process to bind.
Layflat binding
Layflat binding is more of a characteristic than a specific form of binding. Layflat binding allows for a book to remain open and the copy to seamlessly flow across a double-page spread. With layflat binding, a cold glue is thinly applied to the spine. The cover then is attached to the endpapers on either side of the spine, creating a visible gap along the spine. The cover spine is not attached to the book block. This technique provides a strong binding and high-end appearance. Applications for layflat include photobooks, cookbooks and children’s books where having the book open up and lay flat is important.
Automated layflat binding machines have become more accessible and affordable in recent years, which has been a driver in the growth of this binding process.

Photo courtesy of APS
Loop stitching
Loop stitching is a variation of saddlestitching. In fact, it’s done using the same kind of equipment but with special stitching heads to form the loops. This technique is ideal for books with eight to 64 pages. With loop stitching, a wire is stitched through the document. Extra protruding loops of wire stick out on the spine to allow for the book to be used in a ring binder. A design tip is to use colored wire that can make the project really stand out.
Screw binding
This binding technique, also called Chicago binding, can be used for books of any size, although since it is a manual process, it’s typically best suited for one-off pieces or small runs. Loose sheets are collated to form the book block. Two or three holes are drilled along the spine, barrel posts are inserted into the holes and slotted cap screws are screwed into the barrel post by hand. The binding screws come in various sizes and colors to add visual appeal. This binding technique commonly is used for an application with several pages and for short runs.
Side stitching
With side stitching, individual sheets are stacked and then stapled together down the side from front to back. Staples are parallel to the spine and visible from the front cover. This method works best with smaller books, such as those with four to 160 pages, and often can be done using wire-fed saddlestitching machines.
Singer-sewn binding
Recognized by its stitched spine, the Singer-sewn technique allows the book to lie flat once opened. This technique is ideal for binding four to 60 pages and is created by using industrial sewing machines made especially for binding books. It includes a basting stitch that resembles a line of en dashes on the outside with a simple interlocking loop on the inside. Singer-sewn binding often is selected for its aesthetic appeal, especially when using bright or contrasting thread colors. This technique is not for very large runs but can be considered for small- to medium-sized applications.
Square back binding
Square back binding is created with the help of a special module that is added to a saddlestitch booklet maker. It applies pressure to the spine to create a squared appearance – also enabling printing to be added to the spine. It provides a professional-looking binding at a lower cost. This process works best for books with 24 to 200 pages. It’s an automated process that is a perfect solution for all print runs that usually would be saddlestitched. It provides a professional, clean look at a lower cost than perfect binding for most applications.
Book sewing (Smyth-sewn) binding
Book sewing, commonly referred to as Smyth binding or Smyth-sewn binding, provides a durable and high-quality finish for books. This binding allows books to lie flat when opened – a benefit for textbooks, cookbooks, notebooks or any books that need to remain open. Book sewing has seen many changes. What was once a very slow and tedious process now is automated with computerized machines for high-volume binding production. With this process, the machine stitches together individual signatures using binder thread. For extra durability, the signatures then are sewn together. This creates a text block that is sewn into the cover.
Another advantage of book sewing in the age of digital printing and quick turnarounds is that the finished binding can be proofed and validated as soon as it comes out of the book sewing machine. With a perfect bind where glue is used, it may take several hours for the glue or adhesive to dry before a final validation can be made.
Swiss binding
This technique is ideal for books ranging from four to 200 pages and often is used in combination with Smyth binding. Swiss binding refers to the way the text block is mounted inside a case – the text block is fully glued to the inside back cover of the case, leaving the spine of the text block exposed. Try breaking the rules and using a paperback outer case instead of a hardcover.
Tape binding
This technique also is called Fastback binding because it’s usually done with a Fastback thermal tape binding machine. Tape binding uses glue-coated strips that melt to the spine and covers of a book. The book block is loaded into the top of the machine with a binding strip placed into the feeder. Pushing a button moves the binding strip under the spine and heats it, activating the glue and forming the binding strip around the spine. It’s a relatively quick process, although books are bound one at a time, so it is best for relatively shorter runs. This is ideal for books with 20 to 720 pages.
PostPress magazine would like to thank PaperSpecs for input into this article. To get a copy of PaperSpecs’ Binding Cheat Sheet, visit www.bindingcheatsheet.com.
References
- The evolution of bookbinding. Treasures of the McDonald Collection – Special Collections & Archives Research Center. (n.d.). www.scarc.library.oregonstate.edu/omeka/exhibits/show/mcdonald/bookbinding/bookbinding