• Home
  • Article
    • Article Archive
    • Digital Archive
    • ENews Archive
  • Buyers Guide
    • Buyers Guide
    • 2025 Online Form
  • Advertising
    • Ad Options
    • Media Kit
    • Editorial Calendar
    • Electronic Files
  • Awards
    • FSEA Gold Leaf
  • Subscribe
  • Video Vault
  • Webinars
  • Amplify
  • Contact
  • Events
    .smi-preview#smi-preview-10580 { --smi-column-gap: 10px; --smi-row-gap: 20px; --smi-color: #ffffff; --smi-hover-color: #90c43c; ; ; --smi-border-width: 0px; ; --smi-border-radius: 0%; --smi-border-color: #3c434a; --smi-border-hover-color: #3c434a; --smi-padding-top: 15px; --smi-padding-right: 0px; --smi-padding-bottom: 0px; --smi-padding-left: 0px; --smi-font-size: 20px; --smi-horizontal-alignment: flex-end; --smi-hover-transition-time: 1s; ; }
    • Skip to main content
    • Skip to secondary menu
    • Advertise
    • Subscribe
    • Contact
    • Events
      PostPress

      PostPress

      Print Decorating, Binding and Finishing

      • Home
      • Articles
        • Article Archive
        • Digital Archive
        • ENews Archive
      • Advertising
        • Ad Options
        • Media Kit
        • Editorial Calendar
        • Electronic Files
      • Buyers Guide
        • Buyers Guide
        • 2025 Online Form
      • Awards
        • FSEA Gold Leaf
      • Subscribe
      • Video Vault
      • Webinars
        • Upcoming Webinars
      • Amplify

        May/June 2023

        Top 5 Ways to Turn Failure into Advantage

        June 13, 2023

        By Liz Stevens, writer, PostPress

        “The only real mistake is the one from which we learn nothing” – Henry Ford

        Trying, failing and succeeding are part of the business environment. No one succeeds without trying, and no one ever tried without failing at least occasionally. Here are tips for finding value in the inevitable failures experienced by those trying to succeed.

        In every new environment and each growth stage

        A new business and a growing business must go through trial and error to advance. A new business always is going out on a limb; will the limb hold or fail? A business wading into a new market can get nowhere without taking the first risky step.

        In all endeavors, there is potential achievement and the risk of failure. The odds often initially favor defeat, but they trend toward success with repeated enlightened attempts. This advice from the Forbes article, “11 Essential Next Steps for Business Leaders After a Setback,” 1 applies to established businesses and new businesses alike.

        Make adjustments to prevent future mistakes
        When starting a business, one is literally walking into the unknown with uncertainties haunting every business move. With that said, expect a lot of mistakes as the business evolves. Continual failure is necessary for learning and future success. Leaders must adapt, take notes, adjust to protect the business and put measures in place to mitigate these mistakes from reoccurring. – Tian Derose, EAMA, Inc.

        Failure is valuable

        Every experience has value but sometimes it takes effort to identify it, especially when it comes to the value of failure. While not welcoming failure, successful businesspeople know that it will occur; they do not fear it or avoid reflecting on it. They know that failure can be a valuable and necessary aspect of learning, growing and improving.

        In his article, “The smart way to learn from failure,” 2 author David Robson described the “ostrich effect” that some people employ to avoid facing bad news, disappointment or failure. “Devaluing the source of your disappointment is just one way your mind may avoid coping constructively with failure,” wrote Robson. “Another coping mechanism is to hide your head in the sand, shifting your attention away from the upsetting situation so that you don’t have to process it.” To illustrate this, Robson recounted a study by university researchers to gauge people’s memory of positive and negative experiences.

        The people were asked to choose one of two answers to identify objects, and then were told of their hits and misses – a chance to learn from success and failure. In a second round of identifying objects, the participants had learned from their hits but scored no better on their earlier misses. To delve deeper, the researchers conducted another study, asking new participants to review the earlier study participants’ hits and misses, and then to identify the same objects. These people consistently scored higher – they had learned from another person’s hits and from their misses. The takeaway: people often forget their own mistakes but are quite able to learn from someone else’s mistakes.

        How, then, to help people recall failures rather than forgetting them? Choosing to view failure as a learning experience rather than as a loss is a good starting point. Approaching failure as an opportunity to learn why the failure occurred and to then apply those lessons moving forward can remove the stigma of defeat. The Forbes article 1 offers a valuable suggestion:

        Approach failure like an experiment
        … how we handle failure sets the tone for our culture. We focus on the outcome, do our best to avoid shaming our colleagues and approach it almost empirically like a science experiment. Consider what variables you need to change to achieve a different result.– Brian Shore, elevēo

        Own failure and seek feedback

        Successful business leaders know that failures will happen and that value can be derived from examining them; they openly own their failures and ask for honest feedback. Two things manifest by owning failures and welcoming reactions: leaders model a valuable trait for others to emulate, and leaders receive helpful input for addressing the cause of the failure.

        In his TIME article, “Why Your Team Needs a Failure Philosophy,” 3 author Roi Ben-Yehuda noted that most organizations “are hyper-focused on end results, have a low tolerance for experimentation, and provide little time for reflection, all of which create an environment incompatible with learning.” One way to make the most out of failure is to have a business culture with a healthy failure philosophy. During interviews, ask about candidates’ attitudes toward failure. During onboarding, describe the company’s positive philosophy toward failure. In team meetings, acknowledge errors, then search for teachable moments.

        Ben-Yehuda had another tip. “Creating rituals around your failure philosophy – a practice adopted by some of the world’s most innovative teams – also helps make failure feel less lonely and more instructive.” In a final point about leaders owning their failures, Ben-Yehuda quoted Navy Seal Team 6 Commander Dave Cooper: “The most important words a leader can say are, ‘I screwed that up.’” For leaders with the courage to freely admit screwups, wrote Ben-Yehuda, “the question isn’t ‘Will we fail?’ but rather, ‘How will we learn from our failures?’”

        Analyze failure

        Before the “do’s,” here’s an important “don’t” from Steven L. Blue’s Industry Week article, “6 Important Business Lessons I Learned from Failure.” 4

        Don’t analyze success
        Don’t ever waste time on why something went right. Of course, you should always analyze how you might have done better, but that should not be your focus. You should always do a deep dive on your failures for the lessons they hold.

        To learn from failure, examine it closely with a post-failure audit, including analyzing the variables and their weaknesses as a scientist would do following an experiment. Here is how Christian Busch, director of the global economy program at New York University’s Center for Global Affairs, described deriving value from failure in Suvarchala Narayanan’s Strategy+business article, “Connecting the dots in an uncertain world.” 5

        Conduct project funerals
        When a project – for example, a new technology that was brought to market – doesn’t work out, the respective project manager “lays it to rest” in front of colleagues from other divisions and reflects on why it did not work out and what can be learned from it. This is not about celebrating failure – it’s about celebrating the learning from failure. What often happens is that people in the audience “coincidentally” connect it to a project that they are working on, and elements of the project are then unexpectedly repurposed for another use.

        Limit retrospection

        Accept the inevitability of failure, own it, acknowledge its value, find its lessons. Then carry on. This Forbes article excerpt 1 wraps it up and puts a bow on turning failure into advantage:

        Reflect but do not wallow
        After a failure in business, honest reflection is essential to unlock any valuable lessons that can be learned. Then, quickly move on. Do not wallow; instead, examine the situation with an honest eye, adapt and move forward. Leaders who strive to create an environment that normalizes openly discussing failure gain valuable insights and allow for greater opportunities for success the next time around. – Ronke Komolafe, Integrated Physical & Behavioral Health Alliance

        References
        1. Forbes Business Council, “11 Essential Next Steps for Business Leaders After A Setback.” March 27, 2023. Forbes.com. https://www.forbes.com/sites/forbesbusinesscouncil/2023/03/27/11-essential-next-steps-for-business-leaders-after-a-setback/?sh=1708567362cf.
        2. David Robson, “The Smart Way to Learn from Failure.” October 21, 2022. BBC.com. https://www.bbc.com/worklife/article/20221019-the-smart-way-to-learn-from-failure.
        3. Roi Ben-Yehuda, “Why Your Team Needs a Failure Philosophy.” August 8, 2022. TIME.com. https://time.com/charter/6204322/failure-philosophy/.
        4. Steven L. Blue, “6 Important Business Lessons I Learned from Failure.” April 20, 2023. Industry Week. https://www.industryweek.com/leadership/strategic-planning-execution/article/21264377/failure-is-the-gift-that-keeps-on-giving.
        5. Suvarchala Narayanan, “Connecting the Dots in an Uncertain World.” September 16, 2020. Strategy+business. https://www.strategy-business.com/article/Connecting-the-dots-in-an-uncertain-world.

        State of UV LED Curing Applications

        June 5, 2023

        By Jennifer Heathcote, GEW, Inc.

        This article originally was published in UV+EB Technology (www.uvebtechnology.com) and has been updated.

        The list of viable UV LED applications continues to grow – as does the number of system suppliers, formulators and original equipment manufacturer (OEM) machine builders supporting those applications. This ongoing increase in activity bodes well for the present and future of UV LED technology. As a result, those who aren’t already investigating its suitability for their own curing needs may find it is time to start. For newcomers, as well as those who have been following or even using the technology for years, this article is meant to provide insight into the growing UV LED market space and to offer general guidance regarding how to match a UV LED curing system to the needs of a given application.

        UV output

        Inks, coatings, adhesives and extrusions are formulated to react to a given UV LED output under a specific set of process conditions. For each application and formulation, there is a UV process window within which acceptable cure can be achieved. This window is not narrow, but there is an optimal set of wavelengths as well as a minimum and maximum irradiance and total energy density combination that results in proper cure. Consistently operating within this window better ensures maximum material handling speeds, a non-tacky surface, depth of cure, post-cure migration within established limits, optimized production yields, product quality over time and optimal product life within the intended use among other desired performance criteria.

        UV LED technology performs well when UV output is correctly matched to the needs of the application and paired with a suitably formulated ink, coating, adhesive or extrusion. Unfortunately, there is no universal UV LED system or process window that works equally well for all applications across all markets and machine types. The UV LED solution and its output must be chosen for the formulation, coat weight, plant or shop environment and the configuration and speed of the material-handling system.

        Figure 1. UV LED web press

        A benefit of UV LED technology is that the discrete nature of LEDs allows for a much wider range of curing system designs that can better fit the needs of each unique application. This allows both lamp head form factor and UV output to be tailored to the respective markets and applications, resulting in much more efficient and economical UV LED curing solutions when compared to conventional curing technology. As a consequence, this also means there is a wide disparity in cure performance among commercially available vendor offerings since the inherent designs can be very, very different, and those differences are not always obvious to OEMs and end users.

        Application evolution

        UV digital inkjet pinning and full-cure in both scanning carriage and narrow single-pass printers, screen printing and spot-cure bonding adhesives used in product assembly were the first applications to adopt UV LED curing in the mid to late 2000s. What these early applications had in common was slower line speeds and longer part processing times. While the irradiance (watts/cm2) emitted from a single UV LED system during those early years was low, it was possible to deliver just enough irradiance by mounting the lamp head within 10 to 15 mm (0.4 – 0.6 inches) of the cure surface. For energy density, the solution was longer periods of exposure in static installations and utilizing multiple passes in dynamic ones.

        Early UV LED applications required lamp lengths that were typically less than 450 mm (17.7 inches). When combined with the fact that many applications required just one or two lamps to achieve cure at speed, the total commercial investment was significantly less than systems needed for wider, high-speed commercial presses that needed multiple lamps and wider lamps. All these factors were crucial, as early UV LED systems were not very powerful and often were more expensive than conventional options.

        Over the past 20 years, UV LED technology has improved dramatically in terms of performance, reliability, life, output and length. In fact, single span lamp heads are now available in lengths up to 2 meters (78 inches) and lamp life often exceeds 40,000 hours. In addition, many formulations are now specifically optimized for UV LED output. The market is also better at matching the UV LED system to the needs of the process window, and the price points of both equipment and formulations have improved due to economies of scale and more competition throughout the supply chain. This has allowed UV LED curing technology to move beyond UV digital inkjet, spot cure, and screen into more demanding, higher speed and wider commercial applications – both analog and digital. This includes sheetfed and web offset, dry offset, flexo, wood coating and finishing, and fiber optic coating.

        Table 1. Areas of use for UV LED technology

        Table 1 represents areas where UV LED technology is increasingly being used today – albeit at varying levels of market penetration and not necessarily for all applications within each market segment – but that will continue to improve with time. Different UV LED lamp designs, as well as application-specific formulations, are needed to make the many diverse printing, coating and bonding processes feasible. As a result, it is important that, for each application, there be a strong working relationship among all parties – UV LED curing system supplier, formulator, OEM machine builder, integrator and end user. In all cases, a viable UV LED solution can be achieved with some trial and error and process optimization provided a viable formulation exists. It all comes down to identifying the process variables and matching the UV LED system to the application, formulation and material-handling equipment.

        Matching UV LED systems to the application, formulation and material-handling equipment

        There is an ever-increasing abundance of UV LED curing systems and vendors from which to choose. All claim very similar product features and operational benefits, with the most obvious differentiators being peak irradiance, cooling method, lamp form factor and system integration. Unfortunately, knowledge of these alone is insufficient for matching UV LED curing systems to a given application. Technical spec sheets rarely provide explanations as to why product(s) are best suited for a given application and seldom reference nominal electrical input power and energy density at a given web, sheet or part speed. When matching a UV LED curing system, the following general guidelines should be considered.

        Final cure properties
        The desired mechanical, chemical, functional and aesthetic properties of the final cure as well as the intended product use should be specified and are instrumental in driving the formulation chemistry and, ultimately, whether a UV LED cured solution is possible today. For example, inks, varnishes and free radical syrup adhesives generally cure well with LED and meet most graphic print requirements. Silicone release, UV hotmelt, and industrial hard coats, however, are still very much in development and years away from wide-scale commercial availability.

        Wavelength
        Commercial curing wavelengths currently include 365, 385, 395 and 405 nm. For most ink applications, 395 nm is the preferred wavelength, with 365 and 385 nm wavelengths used to a lesser degree. Structural bonding adhesives typically work best with 365 or 405 nm, depending on the formulation, but also cure similarly with 385 or 395 nm. Overprint varnishes tend to match the ink wavelength of 395 nm, and when it comes to industrial coatings – both functional and hard – there is no consensus, as development is still ongoing.

        Irradiance window
        The formulation chemistry must be cured within a minimum and maximum peak irradiance (watts/cm2). Operating below a minimum irradiance will result in insufficient cure. Increasing irradiance beyond the maximum does not necessarily produce better results than curing within the established irradiance window, provided the lamp emits enough energy density. Unfortunately, there is no universal irradiance that meets the needs of all formulations. Each market application is different, with the optimal emitted irradiance at the window spanning anywhere from a few hundred mW/cm2 up to and even beyond 30 W/cm2. More important than the emitted irradiance, however, is the actual irradiance that is delivered to the substrate cure surface, as irradiance decreases with the square of distance traveled. Since a watt is a joule/second, irradiance can be rewritten as joules/second/cm2 and is the rate at which ultraviolet energy is emitted from the UV LED lamp head. It is important to note that once the irradiance saturates the chemistry’s ability to absorb ultraviolet wavelengths, excess irradiance converts to thermal energy at the cure surface.

        Energy density window
        The formulation and manufacturing line speed determine the energy density (joules/cm2) needed to fully react the chemistry. A greater energy density results in a better overall cure, allows for a faster line speed and sometimes enables a lower peak irradiance. Not all UV LED systems emitting the same peak irradiance deliver the same energy density. Energy density can be increased by using a lamp which, by design, emits greater energy density, using multiple lamps in combination, slowing the line speed or increasing exposure time.

        Working distance
        This is defined as the offset between the UV LED emitting window and the cure surface. It must be specified for the application and machine set-up, as irradiance decreases quickly with distance. To accommodate greater working distances, consider more powerful lamps (either greater irradiance, greater energy density or both) or an LED solution that incorporates optics or reflectors to contain or collimate the UV wavelengths over a specified distance.

        Cooling mechanism
        The plant environment, preference of the OEM or end user and UV LED system design determine whether the cooling mechanism is forced air or circulated water. Not all UV LED products are available in air-cooled variations, and higher-powered systems typically are water cooled. Air-cooling can be either positive where air is pushed into the lamp head and exhausted to the press environment or negative where air is pulled through the lamp head from the press environment and ducted away. Since UV LED systems do not emit ozone, it is not necessary to exhaust the cooling air outside the facility.

        Mounting space
        The mounting location and machine set-up determine the allowable space for the UV LED head. Water-cooled systems are generally more compact than air-cooled systems. Air-cooled systems also require a minimum clearance around air inlets and outlets to ensure adequate circulation and heat dissipation.

        Optics and shielding
        The lamp proximity and orientation to unwanted cure surfaces influences the use of optics and shielding. Care should be exercised to ensure that UV rays are blocked from digital inkjet print heads, ink and coating pans, and heat-sensitive materials on the machine. In addition, all light should be shielded from direct line of sight with the operator.

        Drastic part profile
        Industrial applications with drastic part surface profiles, cure surfaces or manufacturing lines that require LED lamps to be mounted at greater distances (several inches or more), and the need for incredibly hard, scratch and chemically resistant UV LED top coats are still a bit of a challenge and should be considered in-development for the foreseeable future.

        More recently, regulatory pressure to find alternatives to mercury vapor lamps, sustainability initiatives and a global energy crisis are driving more rapid adoption of UV LED curing systems and spearheading innovation within the chemical formulations. While development is ongoing, UV LED curing technology is becoming the preferred UV source in a growing number of applications. Despite the inability to use the exact same system interchangeably across applications and machine types, there do exist UV LED solution sets that meet the needs of many applications. While OEMs may default to an established LED curing device on new machines and retrofits, it always is recommended that end users confirm through testing or by referencing previous installations that the correct system was matched to the specific needs of the process. Follow the guidelines in this article and work closely with the UV LED curing system supplier, formulators, OEM machine builders, integrators and end users to ensure greater overall UV LED curing success.

        Jennifer Heathcote is a subject matter expert on mercury vapor and LED UV curing systems as well as their use across a broad range of graphic arts, product decorating, and industrial coating and converting applications. Heathcote earned her Bachelor of Science in Mechanical Engineering from Purdue University and her MBA from the Fisher College of Business at The Ohio State University. Heathcote is a current board member of RadTech North America and is VP of business development at GEW, Inc. For more information, visit www.gewuv.com.

        Digital Embellishments Provide Budget-Friendly Experimenting

        June 5, 2023

        By David Drucker, CEO and founder, highresolution

        I have been blessed working with a creative community in New York City. In my career, it didn’t take long before I realized my clients were not just sending me their commodity printing but also including me in their creative conversations. I developed my trade and began to view my work as a form of art. And it was then that the caliper of work changed, and I had to up my game and teach myself the art of graphics.

        Since my first production in 1983, I have been using embellishments as part of my regular printed productions when appropriate. The first was a black A6 envelope that needed my client’s branding and return address. I was introduced to hot stamping, and I opted for a beautiful black-on-black foil stamping. The black foil ironed out the texture on the paper and appeared clean, smooth and added a wonderful contrast. I then began to invest and put my money where my mouth was, trying so many papers and techniques.

        Forty years later, technologies have changed but the desire to offer embellished techniques has not. And now there are so many alternatives – some the same and some that are helping to change designs. Embellishments should work naturally with design but not appear forced. “We want every bell and whistle on this brochure,” says the client. That might sound like a great opportunity to spend the client’s money but, in my opinion, there is nothing artful about that type of production. Artful is what I go for. Quality over quantity.

        Choosing the right time to add embellishments

        I define an embellishment as a foil stamp (hot), cold foil, emboss, deboss, letterpress impression, engraving, clear screened UV, sleeking or the metallics and clear UVs from machines such as a JETvarnish or Scodix.

        When a client asks me to quote a production, the first thing I ask for is an idea of the design. That tells me the story of who will be receiving the piece – whether for a luxury event, direct mail campaign or influencer packaging. The design already might be slotted for an embellishment. I will visit my client or send similar pieces I’ve produced, maybe using different foils or sculptured embossing as a way to start our conversation. By introducing my past experiences in print, it gives the client alternatives that could enhance the end-production. If my client knows exactly what is wanted this time, my samples can help influence future productions.

        What we do not want is to just grab the files and go right into production. I have found that sometimes an interpretation actually has several meanings. So, we want to produce what best works for that particular production. That comes as a result of our conversations and recommendations.

        Digital embellishments

        The digital world has changed the game for short-run productions. Digital embellishments are like jewelry to me. I find that only some of my clients really know about these enhancements. So, again, samples are important and can change the design in a whole new direction. I find that 80% of all my short-run work now is designed for press. Variable printing can be produced in gold foils and looks great. The price also is very competitive for short-runs with no dies or long makereadies – even when producing a one-off.

        What digital embellishments also provide is a low-cost means of experimenting. Since there is no tooling, designs can be changed on the fly. So much knowledge can be gained through these types of experiments.

        The art of embellishments

        Important to me is working with a press person who sees the artistry in the profession. It is amazing the ideas that come with this type of relationship. Knowing the press person and press tolerances means there is less of a guessing game. And the more opportunities one has to have these discussions and experiment on press, the more perfection will be required.

        I had been bouncing around and working with quite a few finishing companies in the early ‘80s. I was introduced to a company in my building called Gailer Stamping and Die Cutting in 1985. Specifically, I worked with a man named Michael Pinciotto. The difference when working with Michael? He took an interest in every production I worked on with him. We had discussions of techniques. His enthusiasm carried right to his press operators, who would push the boundaries. It was so great to learn and experiment with such a great production partner. Designers should ask themselves, “Who’s my Michael?”

        It also is important to get educated on all the wonderful papers available. A slight change in texture, color and weight can influence embellishments into a new direction. Don’t be afraid to experiment by throwing a few extra sheets into the mix when in production. It is “school” for thought and leads to new ideas.

        I like the refraction of light from the different angles of all embellishments. When a finished, well-produced production is handed to a client, watch the client’s face light up. Embellishments are the jewelry and candy of our industry. A great emboss or deboss works with light and reveals shadows, and foils reveal reflection. Find the height or depth of an embellishment and push it just before the point of the paper cracking. Play with clear UVs and see what can be done to make them better. The more designers experiment, the more ideas they’ll have and that makes an easy sale!

        Conclusion

        The bottom line is that I am a consultant who makes recommendations for every production. There is not any phase of the job that I am not fully involved with. That is my advantage, but it also takes up a great deal of time. When recommending embellishments, I can see the end result in my head. It is at this point that I begin to pull on my experiences and offer a direction I would like to see. There’s no reason why I can’t try to reach a higher level of artistry. My clients love this, and it has made my sales process easier and so much more exciting – especially with embellishments! I recommend designers pull on their experiences and state a redirection they would like to go.

        David Drucker is the founder of highresolution, a print consultancy and production management firm. Serving bi-coastal clients, he partners with solopreneurs, design firms, creative agencies and C-suite creative directors at the strategic level to enhance printing, packaging and environmental graphics. Learn more at www.high-res.com.


        Hot-Stamping, Embossing Produces Eye-Catching Holiday Card

        When awarded this holiday card from Lafayette 148, a global lifestyle brand based in the SoHo district in New York City, David Drucker, CEO and founder of highresolution, faced a few challenges in keeping all of the elements pronounced. There were several versions of the inside copy so, he said, it did not make sense to print conventionally. Drucker opted for the HP Indigo.

        The pattern is taken from a sweater that Lafayette 148 had in its winter catalog. “When I saw the actual garment, there were copper highlights and thicker white highlights. Digital embellishments would not work because of their relief bump, so I took my digitally printed sheets and moved them to conventional hot stamping and embossing,” Drucker said.

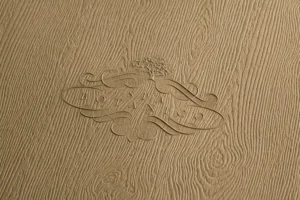
        The copper is hot stamped with light pressure. Drucker said he usually would like to push the paper a bit, but the foil needed to be subtle. On the other hand, the blind emboss was created with a sculptured die to help enhance the feel of the white from the sweater.

        “The sculpture pushed the paper just enough so your eye will capture the shadows and refraction of light without having to run your hand over it,” Drucker said.

        Overall, he said, all of the printing, stamping and embossing work well together and do not compete with each other.

        “I am looking forward to next year’s Holiday Card challenges,” he added.

        In a Design Bind? Try These Unique Binding Options

        June 5, 2023

        By Erin La Row, editor, PostPress

        Since the beginning of books, there has been a need for binding. When Hindi scribes in India began binding palm-leaf manuscripts together with twine during the second century BC, so began the craft of bookbinding. 1 Over time, the need has remained, although the techniques have evolved.

        For some, bookbinding is where art meets function. And despite the growth of ebooks, there’s still value in printed pieces that are tactile and aesthetically pleasing. Today, there are many binding methods – some simple, others more elaborate. There are so many creative options available that Sabine Lenz and the team at PaperSpecs created the “Binding Cheat Sheet” to empower graphic designers to “unlock their creativity and create printed pieces that WOW their clients.” Selecting the right style can make all the difference in the look and feel of a printed piece.

        Most designers and others in the graphic arts arena are familiar with techniques such as saddlestitching, perfect binding, and mechanical binding options such as plastic coil and Wire-O, but they may not be aware of other specialty binding methods available today. A specialty binding technique could be what elevates a project to the next level. The following is a look at some unique binding techniques.

        Japanese binding

        Japanese binding, also called stab binding or hand-sewn binding, dates back centuries and today provides luxurious appeal. Sheets are hole-punched or drilled (typically, four to six times) and hand-sewn along the spine in various patterns. Books can vary in size from four to 480 pages. This is a technique that can be visually stunning when bright or contrasting thread colors are used. It’s important to note that this technique produces a book with a spine that does not allow the book to lay flat. There is no gluing or folding involved, providing a beautiful hand-crafted result without special machinery to create the binding. It is great for individual books or for extremely short runs of just a few, as it doesn’t require an automated process to bind.

        Layflat binding

        Layflat binding is more of a characteristic than a specific form of binding. Layflat binding allows for a book to remain open and the copy to seamlessly flow across a double-page spread. With layflat binding, a cold glue is thinly applied to the spine. The cover then is attached to the endpapers on either side of the spine, creating a visible gap along the spine. The cover spine is not attached to the book block. This technique provides a strong binding and high-end appearance. Applications for layflat include photobooks, cookbooks and children’s books where having the book open up and lay flat is important.

        Automated layflat binding machines have become more accessible and affordable in recent years, which has been a driver in the growth of this binding process.

        Layflat binding
        Photo courtesy of APS

        Loop stitching

        Loop stitching is a variation of saddlestitching. In fact, it’s done using the same kind of equipment but with special stitching heads to form the loops. This technique is ideal for books with eight to 64 pages. With loop stitching, a wire is stitched through the document. Extra protruding loops of wire stick out on the spine to allow for the book to be used in a ring binder. A design tip is to use colored wire that can make the project really stand out.

        Screw binding

        This binding technique, also called Chicago binding, can be used for books of any size, although since it is a manual process, it’s typically best suited for one-off pieces or small runs. Loose sheets are collated to form the book block. Two or three holes are drilled along the spine, barrel posts are inserted into the holes and slotted cap screws are screwed into the barrel post by hand. The binding screws come in various sizes and colors to add visual appeal. This binding technique commonly is used for an application with several pages and for short runs.

        Side stitching

        With side stitching, individual sheets are stacked and then stapled together down the side from front to back. Staples are parallel to the spine and visible from the front cover. This method works best with smaller books, such as those with four to 160 pages, and often can be done using wire-fed saddlestitching machines.

        Singer-sewn binding

        Recognized by its stitched spine, the Singer-sewn technique allows the book to lie flat once opened. This technique is ideal for binding four to 60 pages and is created by using industrial sewing machines made especially for binding books. It includes a basting stitch that resembles a line of en dashes on the outside with a simple interlocking loop on the inside. Singer-sewn binding often is selected for its aesthetic appeal, especially when using bright or contrasting thread colors. This technique is not for very large runs but can be considered for small- to medium-sized applications.

        Square back binding

        Square back binding is created with the help of a special module that is added to a saddlestitch booklet maker. It applies pressure to the spine to create a squared appearance – also enabling printing to be added to the spine. It provides a professional-looking binding at a lower cost. This process works best for books with 24 to 200 pages. It’s an automated process that is a perfect solution for all print runs that usually would be saddlestitched. It provides a professional, clean look at a lower cost than perfect binding for most applications.

        Book sewing (Smyth-sewn) binding

        Book sewing, commonly referred to as Smyth binding or Smyth-sewn binding, provides a durable and high-quality finish for books. This binding allows books to lie flat when opened – a benefit for textbooks, cookbooks, notebooks or any books that need to remain open. Book sewing has seen many changes. What was once a very slow and tedious process now is automated with computerized machines for high-volume binding production. With this process, the machine stitches together individual signatures using binder thread. For extra durability, the signatures then are sewn together. This creates a text block that is sewn into the cover.

        Another advantage of book sewing in the age of digital printing and quick turnarounds is that the finished binding can be proofed and validated as soon as it comes out of the book sewing machine. With a perfect bind where glue is used, it may take several hours for the glue or adhesive to dry before a final validation can be made.

        Swiss binding

        Swiss binding

        This technique is ideal for books ranging from four to 200 pages and often is used in combination with Smyth binding. Swiss binding refers to the way the text block is mounted inside a case – the text block is fully glued to the inside back cover of the case, leaving the spine of the text block exposed. Try breaking the rules and using a paperback outer case instead of a hardcover.

        Tape binding

        This technique also is called Fastback binding because it’s usually done with a Fastback thermal tape binding machine. Tape binding uses glue-coated strips that melt to the spine and covers of a book. The book block is loaded into the top of the machine with a binding strip placed into the feeder. Pushing a button moves the binding strip under the spine and heats it, activating the glue and forming the binding strip around the spine. It’s a relatively quick process, although books are bound one at a time, so it is best for relatively shorter runs. This is ideal for books with 20 to 720 pages.

        PostPress magazine would like to thank PaperSpecs for input into this article. To get a copy of PaperSpecs’ Binding Cheat Sheet, visit www.bindingcheatsheet.com.

        References
        1. The evolution of bookbinding. Treasures of the McDonald Collection – Special Collections & Archives Research Center. (n.d.). www.scarc.library.oregonstate.edu/omeka/exhibits/show/mcdonald/bookbinding/bookbinding

        CNC Engraving Improves Embossing, Stamping Dies

        June 5, 2023

        Machine technology maximizes detail, eliminates chemicals.

        By Hallie Forcinio, writer, PostPress

        Computer numerical control (CNC) engraving is a process where a computer-controlled cutting tool is used to remove material from a workpiece to create a desired shape or pattern. This process has been around for several decades and has been widely used in the automotive, aerospace and manufacturing industries.

        Advancements in technology have led to significant improvements in CNC machines and software, increasing the precision of the engraving process and helping to expand use of the technology for engraving sculpted embossing, combination foil embossing and foiling dies. The CNC machine can perform 100% of the engraving, although some dies still may be produced in a hybrid process that combines CNC engraving with hand finishing.

        “The precision of modern CNC machines is measured in microns, allowing for extremely fine detail and accurate reproduction of designs,” said Christopher Arns, director of sales at H+M USA, a KURZ company, a supplier of hot-stamping and coating technology located in Charlotte, North Carolina. He explained, “This precision results in sharper and more accurate images with less ‘bridging’ or ‘flaking.’ This is particularly important in the decorating industry, where high-quality images and intricate designs are essential.”

        Precise reproduction plus the sustainable nature of the technology will boost adoption of CNC engraving for the production of foil stamping and embossing dies, predicted Robert Murphy, vice president of sales and marketing at DATRON Dynamics, Inc., a supplier of CNC machines located in Milford, New Hampshire. The supplier is working with companies that want to bring engraving capability in-house.

        Successful CNC engraving

        Successful engraving depends on properly prepared artwork. “The three most important items needed for a quality CNC die are artwork, artwork and artwork! High-quality, 100% black and white vector art is crucial to creating a great die,” stated Doug Pendergast, national account director at Owosso Graphic Arts, Inc. Based in Owosso, Michigan, the photoengraver has been in business since 1949 and offers magnesium, brass and copper dies.

        Engravers need to know all facets of a project, but first, and perhaps foremost, they must understand what substrate the die will encounter. “This will help ensure the correct depth and design is achieved for the specific application,” explained Arns.

        In addition, “… clear communication with your engraver is critical,” said Ross Hutchison, president of Universal Engraving, Inc. and national sales manager of Infinity Foils, Inc., both part of the UEI® Group Companies, a supplier of foil stamping and embossing products in Overland Park, Kansas.

        “Important details include the type of engraved die or tool needed, registration requirements, heat comp, press information, the number of dies needed, turnaround time, expectations, engraving perspective and finished intent, to name a few,” Hutchison continued.

        When implementing CNC engraving, another consideration is identifying the right people to process the digital artwork and learning the best practices associated with operating the machine. “When purchasing CNC engraving equipment, it’s important to make sure it comes with proper training so die production can begin right away,” Murphy said.

        Growth of CNC Technology

        Brass, copper and magnesium can be engraved on a CNC machine. Photo courtesy of DATRON Dynamics, Inc.

        CNC-engraved dies offer a sustainability benefit by eliminating the need for chemical etching and related environmental issues. “Engraving dies on a CNC machine is a cleaner process,” commented Murphy.

        However, companies that decide to transition to CNC engraving should be aware they may need to install multiple CNC machines to achieve the same output as their chem-etch lines, which typically offer high-volume production.

        The type of engraving and number of dies will help determine if CNC is the correct choice. There are many benefits to CNC, but the costs involved with the machinery, software and trained operators also must be a part of the equation. It is not the answer for all engraving applications.

        Today’s CNC machines are more accurate and rigid and sometimes include integrated vacuum tables to hold stock material. In addition, cycle times are faster and, in many instances, CNC machines occupy a smaller footprint as well.

        “The use of high-speed spindles, more powerful motors, advanced cutting tools and improved milling programs/strategies have significantly increased the speed of the engraving process,” Arns said. He added, “This increased speed reduces lead times and production costs significantly, which is particularly important in the graphic industry, where turnaround times are critical. With the ability to program and store designs digitally, CNC machines quickly can reproduce designs with a high degree of accuracy and consistency, reducing the likelihood of errors and ensuring that each product meets the same high-quality standards.”

        “These features are vitally important to efficient production of quality dies,” agreed Murphy. Automated processes like an operator interface, which works like a smartphone, and control improvements using software simplify operation and provide step-by-step instructions for job setup and machine operation. Built-in safety features make the systems safe for virtually anyone to run.

        “It takes three days of training to learn how to set up and run dies. Skilled machinists, who are difficult to find, are no longer required,” Murphy said.

        At the front end, CAD/CAM systems used to process artwork and generate “tool paths” for a CNC engraver have become more powerful and easier to use, another time and cost saver. An array of engraving bits is available to achieve different effects. Bits can be resharpened multiple times and are inexpensive to replace when worn out.

        Die materials and designs

        Brass, copper and magnesium can be engraved on a CNC machine. However, brass is the most common metal for most engraving applications.

        “Brass is a durable material and very easy to engrave. Brass can be engraved ‘dry,’ which means no coolant or lubricant is required,” Murphy said. “The brass chips generated by the engraving process can be vacuumed out of the machine using a shop vac and then recycled.”

        Magnesium can withstand high temperatures and is impact resistant, which yields a long-lasting die. “Magnesium is used for embossing and combination dies instead of brass in some situations,” said Pendergast.

        “CNCs can be used with any type of engraved die,” said Hutchison. “It is an operational decision that each engraver has to make – some engravers use only CNC equipment, and others don’t use it at all. We are a hybrid and have developed operational procedures that help us to determine which method of manufacturing is best for each order.”

        Recent developments that rely on CNC engraving include new refractive MicroEmboss and NanoEmboss technology, which creates extremely fine patterns on the stamping die surface. Capable of adding a unique landscape of reflections, depth and dimension to the design, this technology is particularly well-suited for high-end packaging, luxury goods, cosmetic products and security applications. NanoEmboss and MicroEmboss dies do not require a fiberglass counter die and can be combined with emboss and combination dies. “The latest advancements allow MicroEmboss and NanoEmboss technology to be applied on cold foil,” noted Arns.

        New technology advances have moved the art of CNC engraving forward, working with traditional engraving processes to offer more choice for those using dies to decorate print. Historically utilized in automotive, aerospace and manufacturing applications, it’s making itself known in die production for print and packaging.

        ‘Willy’ Print Pushes Boundaries, Engages Imaginations

        June 5, 2023

        by Erin La Row, editor, PostPress

        If there is one movie character who has helped shape childhood imaginations for decades, perhaps it’s the eccentric and mysterious Willy Wonka – founder and proprietor of the Wonka Chocolate Factory. Roald Dahl’s 1964 novel Charlie and the Chocolate Factory first came to life on the big screen in the 1971 musical fantasy film adaptation Willy Wonka and the Chocolate Factory, with Willy Wonka immortalized by the late Gene Wilder. The movie ignited imaginations, leaving many children dreaming of dipping their hands in a river of chocolate or dancing through a park of lollipop flowers and gummy bear trees. Others were shaken by the ominous undercurrent of Wilder’s character (let’s not forget the tunnel scene). Regardless, Wilder delivered a Golden-Globe-nominated performance – veering from charming to mildly sadistic candy maker – that still is captivating more than 50 years later.

        When the team at Post Press Specialties in Independence, Missouri, needed to design a piece to demonstrate the company’s overall capabilities and how fine of a dot could be foiled on its digital embellishment machine, the titular candy man became the inspiration.

        “I first asked for a duotone photo and, after a few days of playing around, Willy Wonka was targeted and we went above the two colors originally planned,” said Andy Humble, president of Post Press. The graphics were created in Adobe Illustrator. The challenge, Humble said, was to intermingle small dots of opaque foil to create an image resembling a lithographic photo. The team was surprised it could produce foil halftone dots in different foil colors in a way none of the team members had ever seen before. The result: a striking image of Wilder’s Willy Wonka in his signature top hat and purple jacket, simply called “Willy.”

        The process

        “Willy” was a piece of whimsy from the start, created on a leftover scrap piece of board that the team laminated. The project was done, design to finish, in an afternoon, with fewer than 10 copies made. It was produced as a sample to show customers.

        “We showed the print to people as we did plant tours and a few samples were given away over time,” Humble said.

        When asked if the company had anything to enter into the FSEA Gold Leaf Awards, Humble said the team found the last two copies and made frames out of paper in the shop. The team then added a black soft-touch laminate they had been given to try and added a quote from Willy Wonka himself: “A little nonsense now and then is relished by the wisest men.”

        The piece was produced on a Konica Minolta JetVarnish EVO 3D using foils made by Crown Roll Leaf. On the MGI, inkjet heads print the image based on the foil pattern and the Willy photo was adjusted to create layers of foil. The UV coating on the sheet then cures under a UV lamp before being re-heated under a hot foil stamp roller, which allows foil to transfer to the areas printed previously with UV. The paper stock used was 24-point CIS with 1.5 mil FeatherTOUCH matte laminate from Leading Edge.

        Inspired by a “world of pure imagination,” Post Press Specialties moved quickly to create the project. “We have a special machine – we have great operators. Let’s make something to show the limits to engage customers’ imaginations,” Humble said. “We have different foil colors and the guidance of, ‘We are the music makers and we are the dreamers of the dreams’ [a Wonka quote lifted from the poem, Ode by Arthur O’Shaughnessy], and – the next day – 10 samples of this were shared.”

        Now, the team at Post Press Specialties is celebrating “Willy” for winning Gold in the category Best Use of Digital Foil (Self Promo) in the 30th annual FSEA Gold Leaf Awards competition. It then took the Best of Show award from among all gold award winners for Digital Embellishments.

        “The ‘Willy’ poster is an amazing demonstration of what can be accomplished with digital embellishments,” said FSEA Executive Director Jeff Peterson. “Even with having a record number of entries this year in the FSEA Gold Leaf Awards, it really stood out and was awarded Best of Show.”

        Humble said he couldn’t be happier about the win: “We enjoy pushing the limits of equipment and operators in an effort to create something never done before. Thanks for the selection of Best of Show!”

        The magic will live on, immortalized in film and print. Humble added that one customer asked for his own copy of “Willy.”

        “He took it and had it matted and framed, and it’s now hanging in his house,” Humble said. “That very much surprised me!”

        In the years since the movie’s debut in 1971, Johnny Depp has added his spin to the quirky character. Later this year, Timothée Chalamet is expected to bring Willy Wonka back to the big screen in the “Wonka” prequel.

        Award Certificates at a Level Above

        June 5, 2023

        by Erin La Row, editor, PostPress

        The team at Gravure Choquet had quite the task – take an already impressive, framed award that its client, RE/MAX Real Estate, had been using for years and make it even better.

        First, Gravure Choquet started with a little inspiration. “We showed [the client] the foil and emboss Mandala we created that won the Best of Show in the Gold Leaf Awards two years ago,” said Yoan Robitaille, sales and business development with Gravure Choquet. “They said, ‘WOW!’ and wanted to do something like it. That was a big demand, but it was something that we were able to accomplish.”

        Robitaille said the Gravure Choquet team went to work, producing different designs for the framed award certificates that impressed not just the client but the client’s members as well. “Our mission was accomplished,” he said.

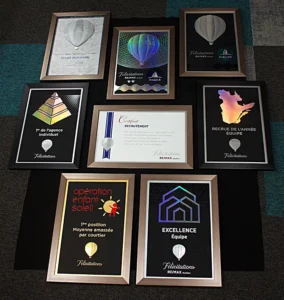
        The team at Gravure Choquet created a series of stunning foil-embossed awards, one of which also impressed judges in the 30th annual FSEA Gold Leaf Awards. With this particular piece, Gravure Choquet won Gold under the category of “Best Use of Foil/Embossing – Miscellaneous Product” and Best of Show within all categories for Best Use of Foil and/or Embossing.

        Robitaille said it was quite a process going from start to finish. The team provided a few designs to the client. “We worked in collaboration with them,” Robitaille said. “The client had only one request – it needed to be a ‘wow’ like the Mandala project.”

        First, the outside box that the framed award sits in was created with a 14 pt. stock laminated with a black soft-touch lamination. The laminated stock then was diecut and assembled into the outside box. The outside frame of the prestigious award was an extruded profile that included a brushed gun metal foil finish.

        For the certificate itself inside the frame, a 20 pt. white Invercote stock was used that allows for crisp, deep embossing with the black soft-touch lamination. Then a Classic Crest 18 pt. stock was used as a second layer cover that was also laminated with the black soft-touch.

        The hard work was just beginning, Robitaille said. More than 35 different versions of the award were manufactured. Within these 35 different versions, there were between eight to 16 passes through the presses, depending on the version. Each framed award was 20 x 14″ in size, creating even more challenges in completing all of the different processes. There were several passes of foil, including flat rainbow foil stamping, silver foil with a textured die and passes of black foil.

        “We did a variation of the different categories with a clear holographic foil, a matte silver and an emboss/deboss with brass dies,” Robitaille said. “We then embossed in register the client’s logo with a deep multilevel emboss brass die. We diecut the two layers for perfect registration for the different categories of the certificates. We added a filler integrated behind the certificates to create weight and depth between the two layers. Finally, all the components were assembled in the frame and integrated in the presentation box.” A textured foil stamping die was used for several of the awards to help adhesion and stability since it was working on soft-touch material.

        “The different foils and deep multilevel embossing brought these pieces to another dimension,” he added.

        A variety of equipment was used during the project, including presses from BOBST, Kluge, Thomson and Sheridan. And while many foil application techniques were used to create the awards, Robitaille said the team didn’t use any new or special technology on the project – only pure craftsmanship and years of experience. The foil stamping engravings were produced in-house by Gravure Choquet and the multi-level embossing dies were produced by Metal Magic. The foils used for the project mainly came from Kurz Transfer Products but also from ITW ShineMark and Univacco.

        “The project required a huge amount of collaboration from our entire team,” Robitaille said. Client requests changed over the course of the project, which was challenging. But Robitaille said working as a team and with experienced press operators – combined with the best equipment on the market – enabled Gravure Choquet to meet the client’s expectations.

        “The client had big expectations for this project – changing something that was used for over 10 years and having members endorse the change to this new product was not a small affair,” Robitaille said. “But after the first gala, I can say the mission was truly accomplished.”


        The Official Publication of the Foil & Specialty Effects Association
        © 2025 All Rights Reserved
        Peterson Media Group | publish@petersonmediagroup.com
        785.271.5801
        2150 SW Westport Dr., Suite 501, Topeka, KS 66614